

How To Add Picture To Another Picture
5 Best Ways to Insert Picture into Picture

If you want to know how you can add a photo to another photo on any device or how to add an image in Photoshop®, you've come to the right place. Here we'll show you how to insert a picture in another picture, for example, by inserting an image in Photoshop® on top of the background or by using an app on your iPhone to add a picture to a picture. You'll also learn how to add a picture to another image using Movavi Picverse – click the link below to learn more about this app.
Photo editor by Movavi
In this guide, we'll show you how to add a photo to a photo in a range of different apps, on computers and on tablets, and smartphones.
Why you might want to insert a picture in another picture
There are all kinds of reasons why you might want to add an image to a photo. You might be wanting to make a meme to share online, such as the "how it started / how it ended" meme. You might want to create a before and after image showing something great you've achieved or created. Or you might want to combine two images in interesting ways, for example, by replacing the background of an image with something completely different or by putting someone from one photograph in another, completely different photo.
The combinations you can make will depend on the app you're using, so for example, you can do interesting things with backgrounds in Movavi Picverse that you can't do on your phone's default Photos app or in Preview on a Mac.
Let's discover how to insert images in Photoshop® and other popular apps.
How to Insert Image in Photoshop®
Photoshop® works differently from some other apps. In many apps, inserting a photo into another photo joins them together in a single image. In Photoshop®, though, when you insert a picture into a picture, it puts each image on a separate layer. That's really useful because you can then do things to one layer without affecting the rest of the image, so for example, you might hide one layer while you're working on another or apply filters or color adjustments to just part of your image. And with a Photoshop® feature called Smart Objects, you can edit the source image separately, and it'll be automatically updated in any image that's added to it.
Here's how to add an image to an existing layer in Photoshop®.
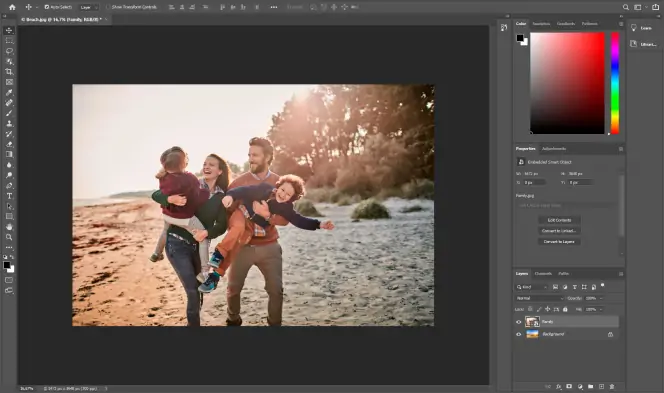
- Open the destination image, which is the image you want to add a photo to, in Photoshop®.
- Go to File >Place Embedded.
- Use the file browser to locate the photo that you want to add to the existing image. Select it and then click Place.
- This will add your new image to the background, which was the photo you already had open. Use the dragging points at the edge centers and corners to resize the image; drag it to move it around. You can now use the Layers inspector to move between the different layers of your image.
- Save your image.
How to Add a Photo to a Photo with Movavi Picverse
Placing a picture in a picture is very easy in Movavi Picverse. Here's how to add photos to another photo.
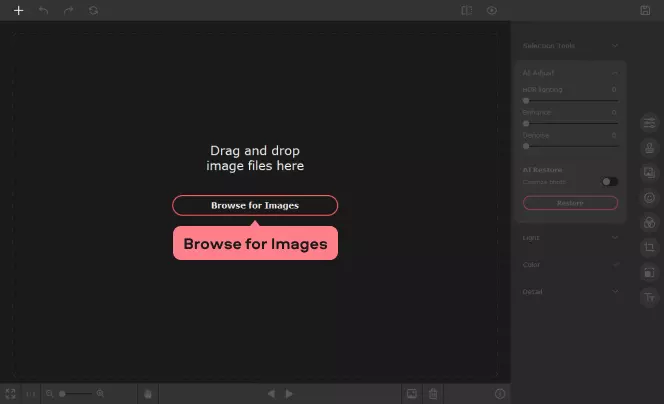
Step 1. Add Your Image to the Program
Click on Browse for Images and locate the photo you want to use as the main image or background.
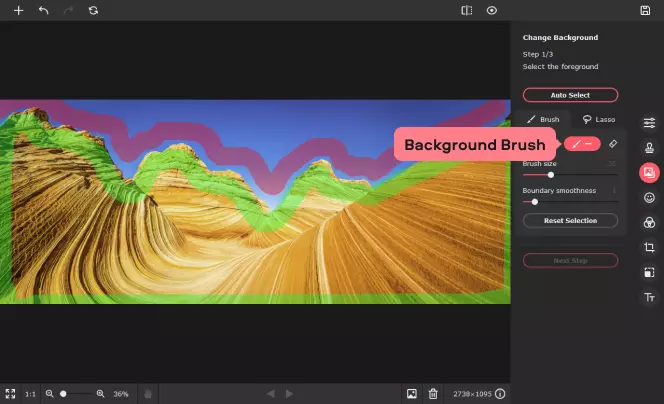
Step 2. Mark the Foreground Objects
Click on the Change Background tab. Now we need to tell Movavi Picverse what bits we'd like to replace. Using the green Foreground Brush, highlight the area you want to keep. You don't need to do this with great precision: you're really just pointing the app at the appropriate bit. Picverse will take care of the hard bits.

Step 3. Mark the Background Objects
Switch to the red Background Brush and repeat the process, this time highlighting the area you want to replace.
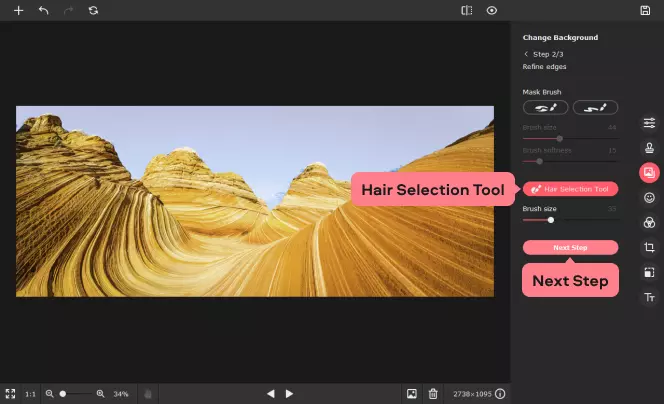
Step 4. Specify the Borders
Click Next Step and use the Hair Selection Tool to make the finer details clear.
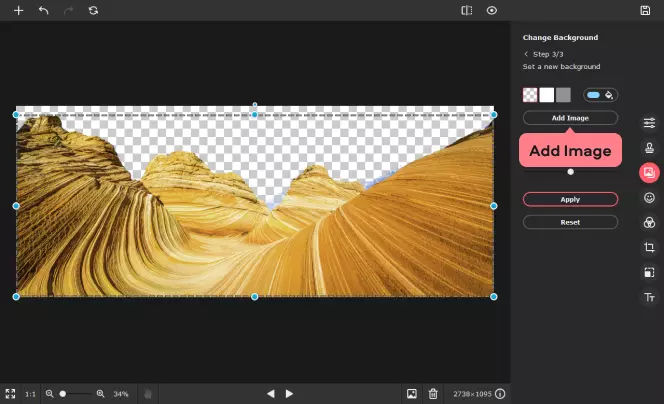
Step 5. Change and Adjust the Background
Click Next Step, and you should see the Change Background option. Click on Add Image, and you'll see thumbnails of the available backgrounds; click on Upload if you'd like to add a different background image.
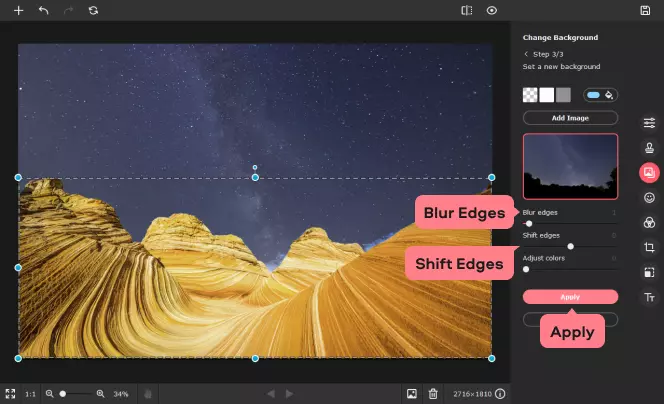
Select your new background, and you'll see it in your image. Use the Blur Edges and Shift Edges to make it look just right; you can also access tools to crop and recolor your image at this point. Click on Apply when you're happy with how it looks.
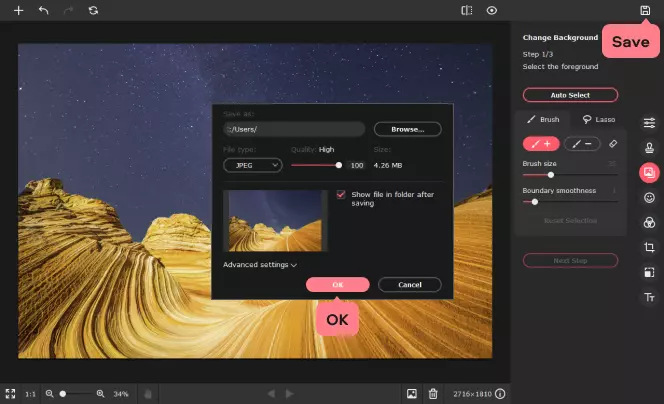
Step 6. Save Your Image
To save the photo, click Save, choose the appropriate image format, and click OK.
How to Add a Picture to a Picture on a Mac
It's really easy to add a picture to a picture on a Mac. You don't need a dedicated app, just the Preview app that came with macOS. Here's how to add a photo to a photo in the Preview app.
- Open the main image from File >Open, or double-click the image in Finder.
- Open the image you want to add.
- In the second image, click on the Markup icon. It's a circle with the top of a pencil inside it.
- The markup toolbar appears. Click on the second icon, which looks like a magic wand.
- Click on any area that you'd like to remove and drag the mouse to adjust how aggressively Preview removes that color. The area to be removed will turn a terracotta/orange color. Don't worry that won't be in the final result. Press the delete key to remove it.
- If the file isn't already in PNG format, Preview will tell you it has to convert. You need to OK this option to proceed.
- The removed area will now turn grey.
- Don't forget about the inside bits: in more complex images, you may have to remove multiple bits of background.
- When you're happy with your removals, use the select tools or press Cmd + A to select the image.
- Switch to the other image and press Cmd + V to paste.
- Your new image should now appear on top of the original image. You can still move it or resize it and add more photos, but once the image is saved, they'll all be locked in place.
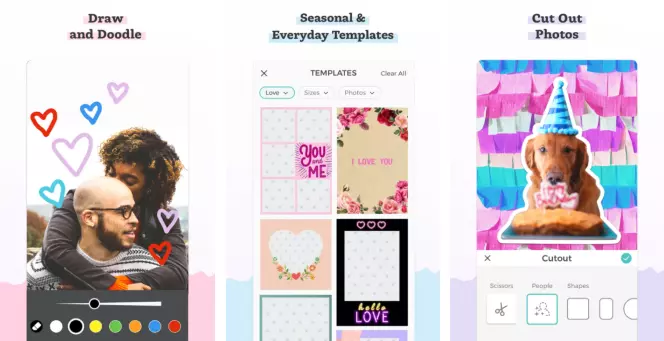
How to Insert a Photo on a Photo on an iPhone
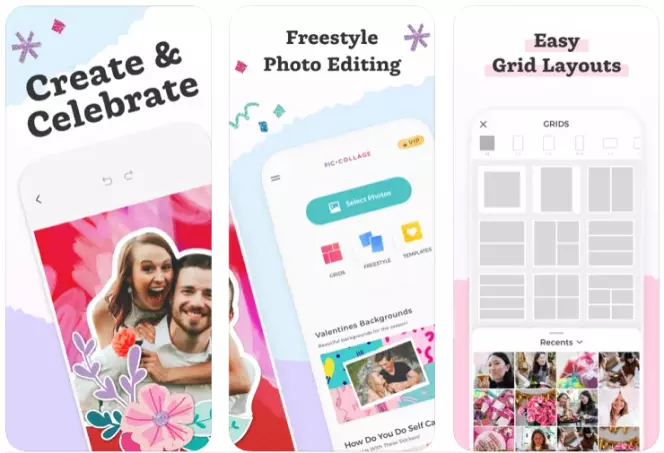
If you want to know how to insert a photo in a photo on an iPhone, you'll need to find an appropriate app: the standard Photos app doesn't have that feature. The best search term to use in the App Store is "collage," and one of the best such apps is PicCollage: in addition to combining images, you can draw on them, cut out bits or backgrounds and add stickers.
PicCollage on the App Store
Here's how to add a picture to a picture in PicCollage.
- Install and open the app and choose Grids.
- Your iPhone will ask if you want the app to access your photo library. You do.
- You should now see your photos. Tap the ones you want to combine. The app tells you in the top right how many images you've selected so far. Tap on it when you've selected the ones you want.
- Your images will now appear in a grid. You can adjust the sizes of the images by dragging them with your fingers.
- Tap on Done when you're finished, and then save or share the new collage.
How to Add an Image to a Photo on Android
Android has the same issue as the iPhone: the default photos app is for editing individual images, not combining multiple ones. That means it's time for a trip to the Play Store, which is absolutely packed with apps that enable you to insert a picture into a picture. Our favorite is PicCollage, which you'll find on the Google Play Store.
PicCollage on Google Play
Here's how to add an image to a photo in PicCollage for Android.
- Get the app from the Play Store, open it and select Grids.
- Tap the images you want to use. You'll see a running total in the top right telling you how many images you've selected. When you've chosen them all, tap on that total to continue.
- The app will now display your chosen images in a grid. You can adjust image sizes by dragging with your fingers.
- Tap Done when you're ready to save or share your masterpiece.

Ben is a writer from the UK with qualifications in Media and Music Technology, he specialises in software reviews and tutorials. Ben has been blogging about media and tech subjects since he was a teenager from his base in the East of England.


Movavi Picverse
Easily enhance images and get professional-grade results in a snap.
*The free version of Movavi Picverse has the following restrictions: you can save up to 10 images with added watermark, screenshots are disabled. Learn more
Frequently Asked Questions
How do I make sure I get the best results when I add a photo to another photo?
One of the most important things to consider is the quality and color of your images: if you're trying to make something that looks realistic, you don't want to stick a really low-resolution image on a high-resolution one or put an object shot in daylight on a background where the sun is coming from a different direction or at a completely different time of day.
What can I do if my two photos don't quite match?
Many image editors are designed to do all kinds of corrections, so for example, you can adjust the color balance, the brightness, and so on. If your image editor uses layers, different parts of your final image are kept on separate layers that can be adjusted independently. For example, you might want to make the object in the foreground brighter without also lightening the background.
In powerful editors, you also get all kinds of layer effects that change how the different layers in your image appear.
If your particular image editor doesn't support layers, it's really important that you get your color adjustments and effects sorted before you combine your images together. If you don't, you may find that you can only make global adjustments rather than adjustments to just part of the image.
How can I put two photos side by side?
The quickest way is to create a new image and then copy each photo individually. Not all apps can do that, though, so for example, Preview on the Mac doesn't enable you to create a new image of a specific size. No problem: open one of your images, copy it and choose File >New From Clipboard. This creates a new copy of the file. Now, go to Tools >Adjust Size. Click on the icon of a padlock to unlock it and then double the width. Press Cmd + A to select everything and tap delete. You've now got a perfectly sized blank canvas that you can paste your images on. In a nice touch, Preview will display yellow rulers when your second image is in line with the first one. These rulers make it easier to snap to the perfect position.
I've put a photo in a photo, and I've changed my mind. Now what?
That depends on the app you're using and when you changed your mind.
If you're still in the app with the finished image open, just use the undo button (or Cmd + Z on a Mac; Ctrl + Z on a PC) a few times to undo your changes.
In an app that uses layers, your project file will retain all the different layer information so you can make as many changes as you want at any time. You can then re-export your edited image.
Not all editors have that feature, however. On your phone, that isn't an issue because third-party apps save their collages as new images (and in the iPhone photos app, any edits you make there are non-destructive, too. Which means you can go back to the original any time). But on a computer, apps such as Preview on the Mac don't save in a format that keeps the layers intact: once you've closed the image file, the changes are permanent.
Don't worry, though; there's a fix. One of our favorite Mac commands is Revert To Saved, which you can use to rewind time. Just open the image in Preview and choose Revert To. This gives you the option to revert to the last saved version or to browse all the previously saved versions of the file. The same command is available in other apps too.
What is the best app for adding a photo to a photo?
That really depends on what other features you want to have, such as intelligent background removal or AI-powered photo restoration: you won't get them in an app designed to combine two images and put stickers on the top. Naturally, we're going to recommend Movavi Picverse because it's great, but there are lots of image editing apps out there, and the steps we've outlined above apply to many of them.
How To Add Picture To Another Picture
Source: https://www.movavi.com/learning-portal/insert-picture-into-picture.html
Posted by: halehimentrapsed.blogspot.com
0 Response to "How To Add Picture To Another Picture"
Post a Comment